WooCommerce checkout monitoring is a recurring, automated check of a selected buyer journey. Instead of asking only whether a page loads, it can open a product, add it to the cart, continue to checkout, enter safe test details, and confirm that the expected shipping and payment choices appear.
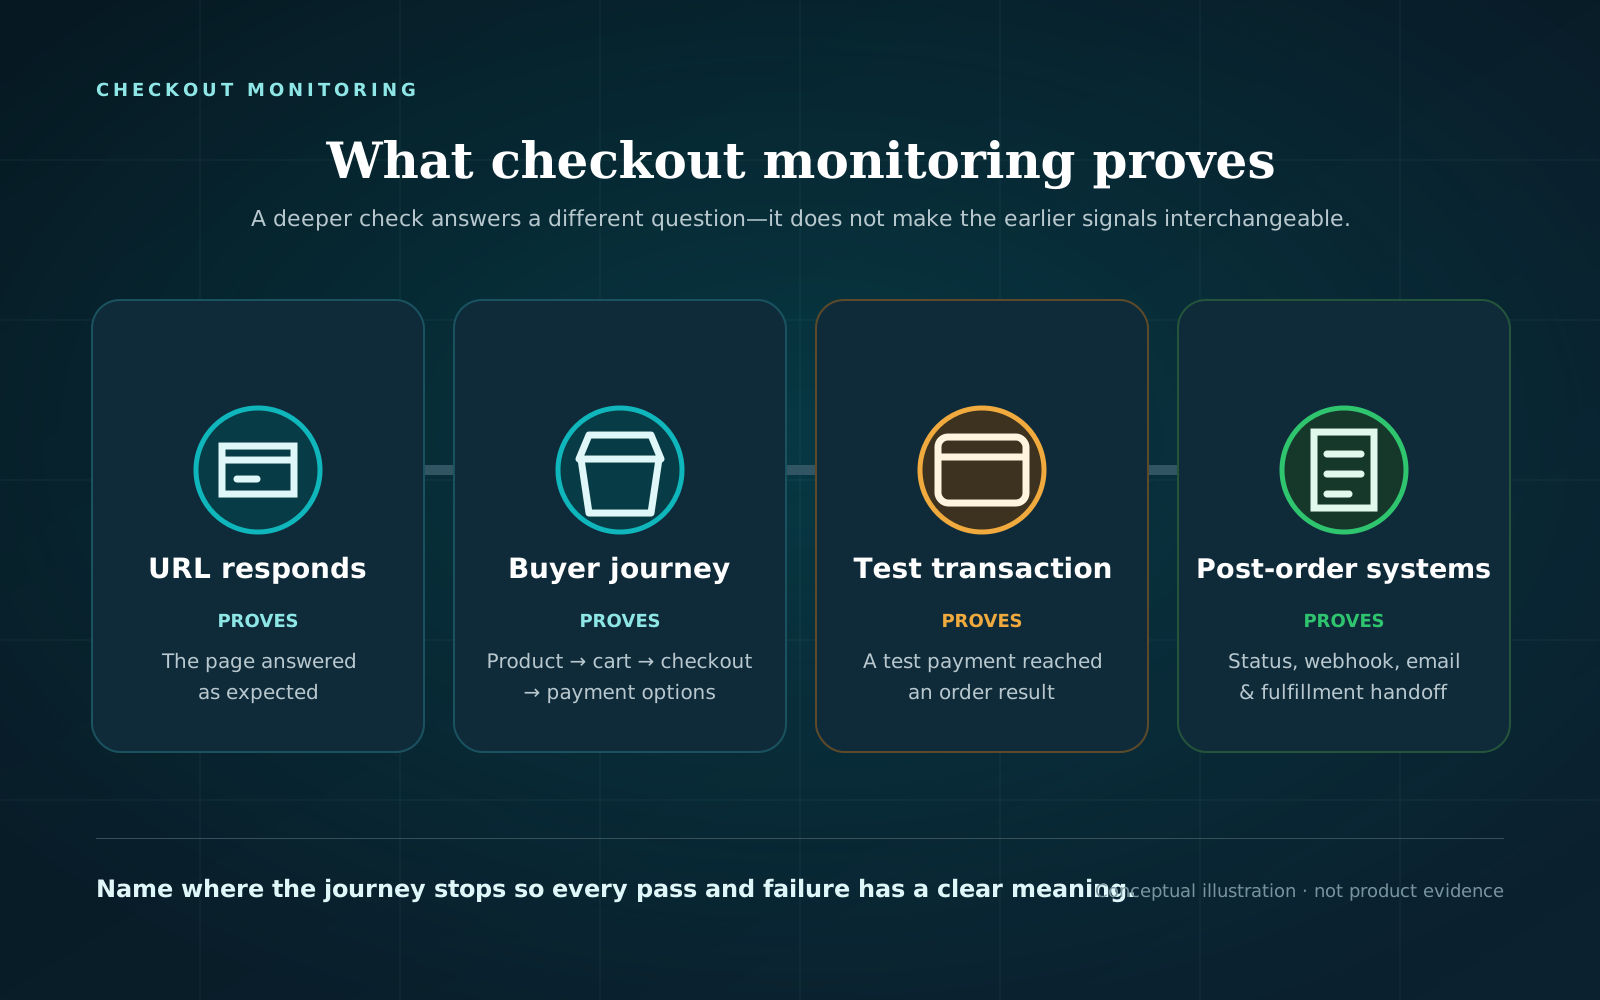
“Checkout monitoring” does not always mean placing an order. One monitor may stop before the Place order button. Another may use a gateway sandbox and create a test order. A deeper test may also verify the order status, webhook, email, inventory, or fulfillment handoff.
Those checks are not interchangeable. A useful monitoring plan states what the journey does, where it stops, and what a pass actually proves.
Checkout monitoring is not the same as uptime monitoring
A homepage or checkout URL can respond while a later interaction fails. Conversely, a checkout test can fail because its monitoring runner or network has a problem, not because the store is broken. That is why each signal needs a clear question and evidence.
| Signal | Question it answers | What it does not prove |
|---|---|---|
| Page or uptime check | Did this URL respond as expected? | That a buyer can add a product, get a shipping option, or see a payment method. |
| Error and log monitoring | Did the store record a known server, gateway, or background-task problem? | That the buyer-facing journey works when no relevant error was logged. |
| Recurring browser journey | Can this browser complete the selected product-to-checkout steps now? | Any untested product, address, device, gateway, payment, or post-order process. |
| Manual sandbox order | Can this gateway’s test mode create the expected test order in this scenario? | That live credentials and every production-only rule work. |
| Real-order operations | Are actual orders, payments, and downstream systems reaching expected states? | That a buyer who never creates an order is not blocked earlier. |
The layers work together. Uptime can identify broad availability problems quickly. Browser monitoring exercises the public path. Transaction tests check payment and order behaviour. Logs and order data help diagnose what happened.
What should a WooCommerce checkout monitor check?
The best starting journey is representative, not exhaustive. Choose a product, customer state, address, shipping path, and payment expectation that matter to the store. Then make each step observable.
1. A product can enter the journey
Open a real, purchasable product or variation. Confirm that required options can be selected and the add-to-cart control is usable.
Record the product or variation and the test time. A pass for one simple product does not cover a variable product, subscription, bundle, backorder, or role-restricted item.
2. The cart holds the expected item and totals
After adding the item, verify that the cart is not empty and that the product, quantity, currency, and visible totals match the scenario.
This catches a different class of problem from a page-load check: the product page may render while the cart session or add-to-cart action does not behave as expected. It still does not validate every coupon, tax rule, or address.
3. Checkout loads as the buyer sees it
The Checkout page is the place that displays shipping and payment options. A browser journey should reach that assigned checkout, handle only safe fields, and detect whether validation or page behavior blocks progress.
Use an outside, logged-out browser context when guest checkout is part of the scenario. An administrator’s existing session may have different cookies, roles, cache behavior, and saved details.
4. The expected shipping path appears
For shippable products, enter a defined address and check the expected method. “A shipping option appeared” is weaker evidence than “the Ground method expected for this cart and ZIP code appeared.”
Treat the result as scenario-specific. Shipping zones, classes, package contents, and destination can change the available methods.
5. Payment methods and the order control are visible
Check for the gateway or payment choice expected for that cart and customer context, plus a usable Place order control.
Visibility is an important checkpoint, but it is not payment authorization. A gateway can render at checkout and still fail after submission. If the monitor stops here, say so.
6. The monitor leaves evidence someone can use
A red alert without a timestamp, failed step, URL, and browser evidence forces the responder to start from scratch. Retain enough information to answer:
- Which journey and browser ran?
- What was the first failed step?
- What did the buyer see?
- Which shipping and payment methods were expected?
- Was the failure repeated?
- Did the monitor itself report an infrastructure error?
A screenshot is useful, but it is not the entire diagnosis. Pair it with step results and relevant store evidence.
Choose where the automated journey stops
There is no universally correct depth. Choose the shallowest test that answers the operational question without creating unacceptable side effects.
Option A: Stop before order submission
A no-submit journey can run against the public store and check product, cart, checkout, shipping, payment-method visibility, and the Place order control. It avoids charging a payment method or creating an order.
This is a practical recurring baseline when the question is: “Can a public buyer reach the payment step in this scenario?”
It cannot prove that payment authorization, order creation, order-status updates, webhooks, email, inventory, or fulfillment work.
Run a free checkout test to check the public path through the payment step. The free test does not submit payment or create an order.
Option B: Run a sandbox transaction on staging
Use this when you need to verify payment and order creation after a gateway, WooCommerce, checkout, or integration change. It’s best practice to perform test payments on a staging site because test orders can trigger emails, enter analytics, and affect integrations; core WooCommerce also has no universal special status for test orders.
For a staging-first procedure, follow this guide to testing WooCommerce checkout safely.
Option C: Use a controlled transaction strategy in production
Some teams need evidence from the live environment because staging cannot reproduce every production state. That requires a store and gateway-specific design: authorized test instruments, a clearly identified product, fulfillment and email safeguards, accounting and analytics handling, cleanup, and an owner who understands the downstream effects.
Do not improvise this by repeatedly placing and refunding real orders. If the safeguards and expected states are not explicit, use the no-submit production journey and a separate staging transaction test.
Which monitoring depth do you need?
Use this decision path:
- Need recurring confidence that a public shopper can reach payment selection? Run a no-submit browser journey on a schedule.
- Need to prove a gateway test payment and WooCommerce order creation after a change? Run a manual or automated sandbox transaction on staging.
- Need to prove post-order behavior? Add separate assertions for the expected order status, gateway transaction or webhook, transactional email, inventory, subscription, fulfillment, and other connected systems. Only assert the systems the test actually observes.
- Investigating an actual failed or pending order? Start from the order status and notes, then inspect the relevant gateway documentation and logs. WooCommerce notes that a paid order left at Pending Payment can point to gateway-to-store communication trouble.
- Seeing delayed emails or background work? Review WooCommerce logs and Scheduled Actions. WooCommerce’s Scheduled Actions view exposes pending, complete, failed, and in-progress work plus error details; transactional-email logs distinguish sent, failed, disabled, and skipped attempts.
A single tool does not have to cover every layer, but your operating procedure should show how the layers connect.
Practical WooCommerce checkout monitoring checklist
Use this checklist to define the journey before turning on recurring alerts.
| Check | Expected evidence | Proof boundary |
|---|---|---|
| Representative product | Product/variation URL, selection, timestamp | Other catalog paths remain untested. |
| Add to cart | Item and quantity remain in a fresh browser session | Other session and customer states remain untested. |
| Cart review | Expected item, currency, and visible totals | Other coupons, taxes, and addresses remain untested. |
| Checkout page | Assigned checkout loads and safe required fields work | Payment and order processing are not yet proven. |
| Shipping | Named expected method appears for the test address | Only this cart and destination are covered. |
| Payment | Named expected method and Place order control appear | Visibility does not prove authorization. |
| Submission boundary | Written record of “no submit” or approved test-transaction mode | An ambiguous test can create unsafe assumptions or side effects. |
| Evidence | Timestamp, browser, first failed step, screenshot or trace | Retention and detail depend on the monitoring setup. |
| Alert route | A test alert reaches the responsible person or channel | A delivery test does not guarantee a fixed notification time. |
| Recovery | The same journey passes after the change | The result remains point-in-time and scenario-specific. |
Also decide:
- Frequency: base it on how long the team can tolerate an undetected failure, the store’s change pattern, and the cost/noise of each run. There is no universal best interval.
- Alert threshold: decide whether to notify on the first failure or after a confirming run. Confirmation can reduce noise, but it also delays notification.
- Ownership: name the person or on-call role that receives the alert and has access to the store, gateway, and hosting evidence.
- Change triggers: run an on-demand check after material updates to WooCommerce, the gateway, theme, checkout extensions, caching/CDN rules, shipping, tax, or custom checkout code.
- Coverage rotation: add another product, address, browser, or gateway only when it represents a meaningful risk. Do not call one scenario “complete coverage.”
What to do when a checkout monitor fails
A calm response protects evidence and reduces risky guesswork.
- Read the first failed step. A product-page failure and a missing payment method point to different owners and evidence.
- Check the monitor’s own status. Separate runner, DNS, network, authentication, or timeout problems from buyer-path failures.
- Preserve the timestamp and evidence. Save the failed URL, screenshot, browser/device profile, expected method, and run identifier before changing the store.
- Repeat the same journey once when safe. A confirming run helps identify a transient result. Do not loop a transaction test that creates orders.
- Reproduce as a logged-out buyer. Use the same product, address, and expected method. Avoid changing several plugins or settings before you can reproduce the symptom.
- Inspect the relevant WooCommerce evidence. The System Status report can show versions, page assignments, template overrides, and environment details. WooCommerce logs can expose fatal errors; some gateway logs must first be enabled in that extension.
- Inspect Scheduled Actions or order evidence when the failure is later in the flow. A browser journey that stops before submission has no order to inspect. A transaction-level failure may have order notes, status, gateway records, email logs, or failed background actions.
- Make the smallest justified change, then rerun the same journey. Record the recovery result and time. A different test scenario is not direct recovery evidence.
If checkout is actively blocking buyers, follow the store’s incident process. Avoid clearing caches, disabling plugins, or changing payment settings blindly on production; each action can erase evidence or introduce another variable.
How Checkout Watch approaches the boundary
Checkout Watch’s current connected-store browser journey opens a representative product, adds it to the cart, reviews cart contents and totals, opens checkout, fills safe details, and checks shipping methods, payment-method visibility, and the Place order control. It deliberately confirms that no order or payment was submitted.
Scheduled runs can record step results and browser evidence. Qualifying failures can become incidents, with email or Slack notifications sent to eligible verified recipients according to the configured threshold. This provides evidence for the public path through payment selection; it does not verify payment authorization, order creation, webhooks, email, or fulfillment.
You can see monitoring plans after you have defined the journey and proof boundary you need.
Frequently asked questions
Is uptime monitoring enough for a WooCommerce store?
It answers an important availability question, but not every checkout question. A URL response does not show whether a product enters the cart, a shipping method appears, or a payment option is usable. Keep uptime monitoring and add a buyer-journey check when you need evidence about those interactions.
Does checkout monitoring place test orders?
Sometimes, but it should never be ambiguous. A no-submit monitor stops before placing the order. A transaction-level monitor uses an approved sandbox or controlled transaction design and must account for emails, analytics, inventory, fulfillment, and other integrations. Check the monitor’s documented stopping point.
How often should WooCommerce checkout monitoring run?
Choose an interval from your acceptable detection window, store activity, and operational cost. Also run an on-demand check after material checkout-related changes. A faster schedule shortens the possible gap between checks, but it does not expand the scenario’s coverage.
Does a green checkout check guarantee that checkout works for everyone?
No. It shows that the defined journey passed at that time. Products, variations, addresses, shipping zones, coupons, customer roles, browsers, devices, gateways, and external services can take different paths. Record the scenario beside every result.
Start with one defined buyer journey
Write down one representative product, address, shipping method, payment expectation, browser profile, stopping point, alert owner, and evidence requirement. Run it once. Confirm that a deliberate safe failure produces a useful alert. Then schedule it and add coverage only when a specific risk justifies another scenario.
Run a free checkout test to see whether the public product-to-checkout path reaches the payment step. It does not submit payment or create an order, so use a separate sandbox transaction when you need payment and order proof.